
Practical owner and customer guides · Updated
Starlink Piso WiFi: connect the internet source, then test the portal
Published by Piso WiFi Pause · How we check guides
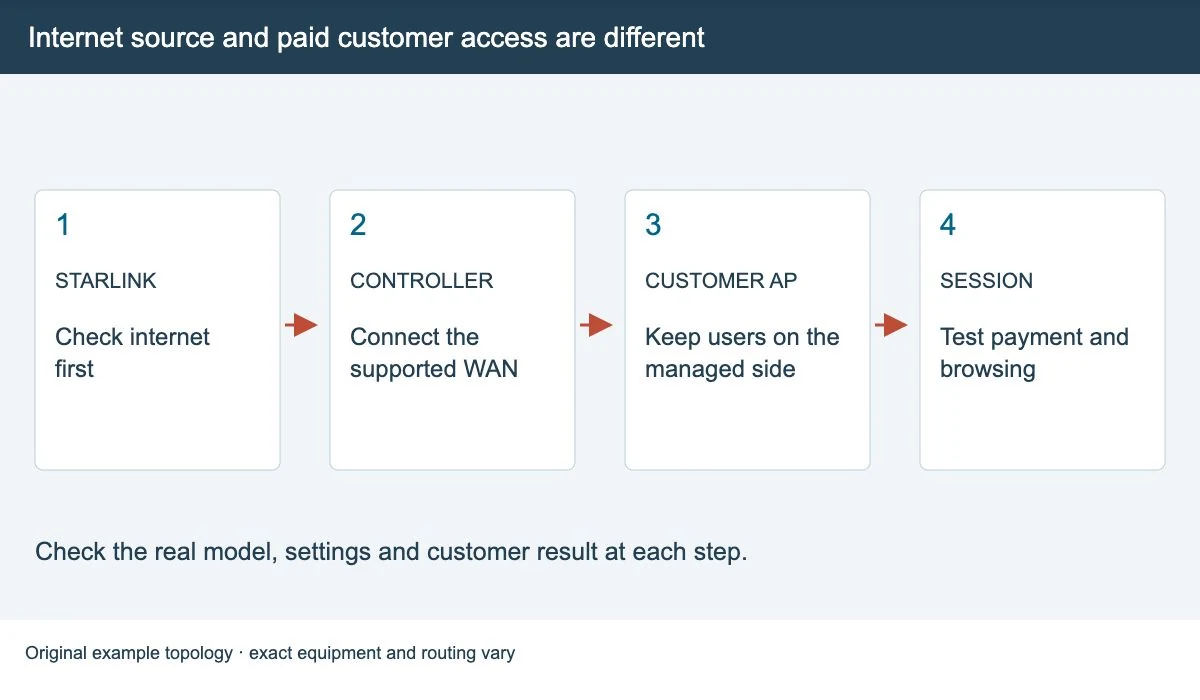
Starlink supplies the internet connection. Your Piso WiFi controller still handles payment, credit and the customer portal. First confirm Starlink works on its own. Then connect its supported Ethernet output to the vendo’s internet side and test a customer session.
Check the kit, plan and ports before connecting
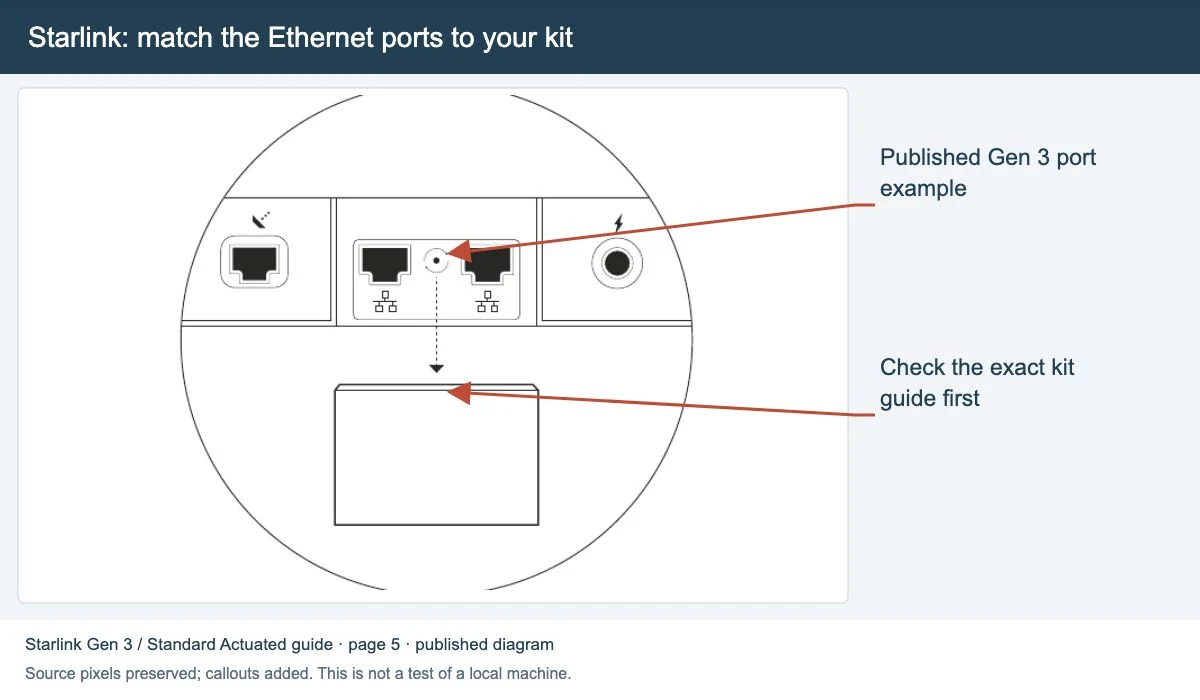
Write down the Starlink kit and router model, the Piso WiFi controller, and the installed software version. Different Starlink kits have different ports and adapter needs. A guide for a Standard Actuated kit is not a wiring guide for every newer kit.
Check the current service terms for your country and plan before selling access. Ask Starlink to confirm whether your intended hotspot use is permitted. A plan name or a seller’s promise is not enough. This guide does not quote plan prices or decide whether a contract permits resale.
- Find the official setup guide for the exact kit. Check whether an Ethernet adapter is required.
- Ask the vendo installer which port receives the internet connection. It may be a separate router or a controller interface.
- Back up the current configuration before changing a working installation.
Keep the internet side and customer side clear
A common layout is: Starlink equipment, then the vendo’s internet-facing connection, then the managed customer network and its access point. The exact cables and routing depend on your controller.
Do not connect a customer access point straight to an unmetered Starlink connection if those users are meant to pass through the vendo. That creates a different network path and may bypass the payment system.
See the vendo parts and setup guide if you are not sure which device controls sessions.
Connect in stages so a fault is easy to find
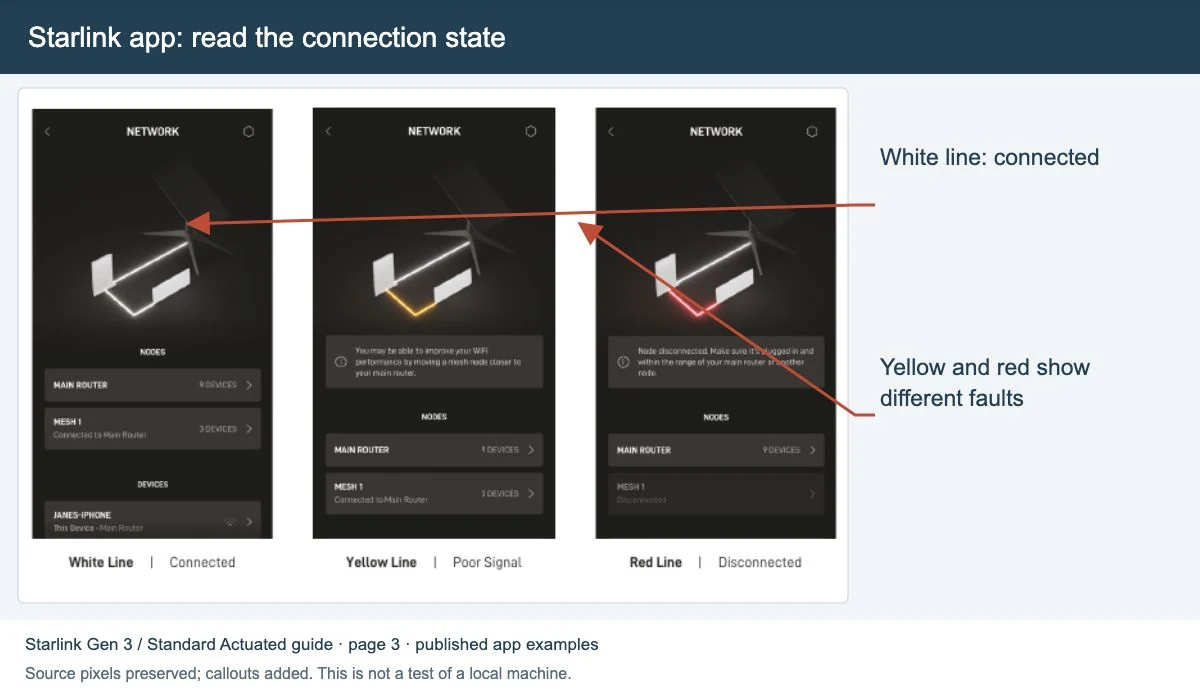
- Finish the Starlink setup using its own guide. On the owner connection, confirm that a normal website opens and check the Starlink app for alerts.
- Use the supported Ethernet output or adapter for that kit. Connect it to the internet-facing port identified by the vendo installer.
- Follow the controller’s network guide for its internet connection type and address settings. Confirm it receives a working connection.
- Join the customer WiFi with a separate test device. Open the local portal and complete an agreed test payment or voucher.
- Check browsing, credited time or data, pause if offered, and the end of the paid session.
Starlink’s published Gen 3 router guide shows extra RJ45 ports for third-party equipment. Its Standard Actuated setup also describes an Ethernet adapter for a particular wired arrangement. Match those instructions to your actual kit; do not buy an adapter based only on the words “Starlink Piso WiFi”.
Do you need bypass mode?
Not every installation needs the same router mode. Bypass mode changes what the Starlink router does, so the installer must plan who will handle routing and the customer network. Check the kit’s official instructions before switching it on.
The linked Gen 3 guide says a factory reset is needed to leave bypass mode in that documented setup. Do not enable it as a quick fix for a missing Pause button. Keep a recovery plan before changing a working network.
Find which connection failed
| What you can see | Check next |
|---|---|
| Starlink itself has no internet | Check the owner app’s alerts and the official kit troubleshooting guide. |
| Starlink works, but the controller has no connection | Check the cable, Ethernet port and controller internet settings. |
| The customer portal opens, but paid users cannot browse | Check active credit, then the controller’s upstream connection. |
| Only distant customers lose WiFi | Check the local access-point coverage before changing the satellite setup. |
Use the paid but no internet checks or the range-extension guide for the matching fault. Starlink does not set the local portal address or enable your platform’s Pause button.
Quick questions
Is there a separate Starlink Piso WiFi login?
The customer still uses the portal supplied by the vendo operator. Starlink account access is a separate owner service. Use the customer login steps for paid browsing.
How much will this setup earn?
We do not have verified earnings for your location. Keep equipment, internet, maintenance and power costs separate from customer payments. This guide explains connection checks, not an income forecast.
For normal session controls after setup, return to the Piso WiFi pause and resume guide.
Screens to help you check the right thing
Real source screenshots and project diagrams, with arrows added for this guide. Interface values are preserved. These are labelled examples, not a test of your local machine. Open an image full size to inspect its controls.
Sources and limits
Guide updated on 12 November 2026. This independent guide uses published platform documentation. We have not tested your local machine or every software version. Images marked as examples are illustrations. Captured screenshots show the source listed in the caption.
- Starlink Gen 3 router guide for Standard Actuated
- Starlink official service terms
- AdoPiSoft basic network setup
Found a website error? Send a correction to the publisher. For paid time or machine access, contact the local operator.